
Supplement 295 Model #271 - Winter 2014
Color Blocked - Kimono Sleeve Top
As appealing as this pattern looked on the drawn model I found it needed quite a bit more shaping for my hourglass shape. This is the reason for the different iterations but I've found I like each and every one of them.
Pattern Drafting Hints:
The photo below is the line drawing of the actual front pattern piece.


 The top with black zig zags was made from this pattern with an inch added at the bottom for good measure. Now this was a pattern I could work with!
For the tunic on the right, I just added a 6 inch deep rectangle half the width of my fabric to both front and back pieces and attached them with clear elastic in the serged seam. Since the "skirt" panels were just slightly wider than the pattern pieces and the elastic was just slightly smaller than the bodice pieces I stretched them all while I sewed the seam and ended up with a little gathering.
Closing Hints:
Yeah, I know the leggings are a little loud. I was going for clothes that I could wear to and from the gym without actually looking like I just left the gym. A quick change into my tunic and boots and this is what I got. The leggings BTW are Lutterloh pattern #232 from Supplement #287- Nov. 2012. I'll be making more of these too!
What a great way to use up some remnants though, huh? The shorter tops only took about one yard total so if you have one small remnant and a larger one you're in business for this pattern. I'll be tucking this one away for later remnants.
Since we're getting close to the middle of February we can be expecting a new Lutterloh supplement to show up soon. I usually check for it first on the German Lutterloh site here:
https://lutterloh-system.de/produkt-kategorie/archiv/
Please check our side bar or use your favorite search engine to find a Lutterloh dealer closest to you.
Happy Sewing until next time,
Ann in Calif.
*For Ann's patterned fabric the fitted sides are wonderful. If you have a top all made (and the print will not be hurt by it), after the fact you can add some darts. They will be going from the bust circle to the hem. You do not need to change the hem, taper the dart at the bust and hem making it larger at the waist.
It's easy, you have finished your top, it's a bit too loose, put it on wrong side out and pinch in a dart at your waist. If you wish to do the same in the back you'll need a friends help. We dart knit fabric all the time for a better fit. However loose is lovely in hot weather.
Fonnell

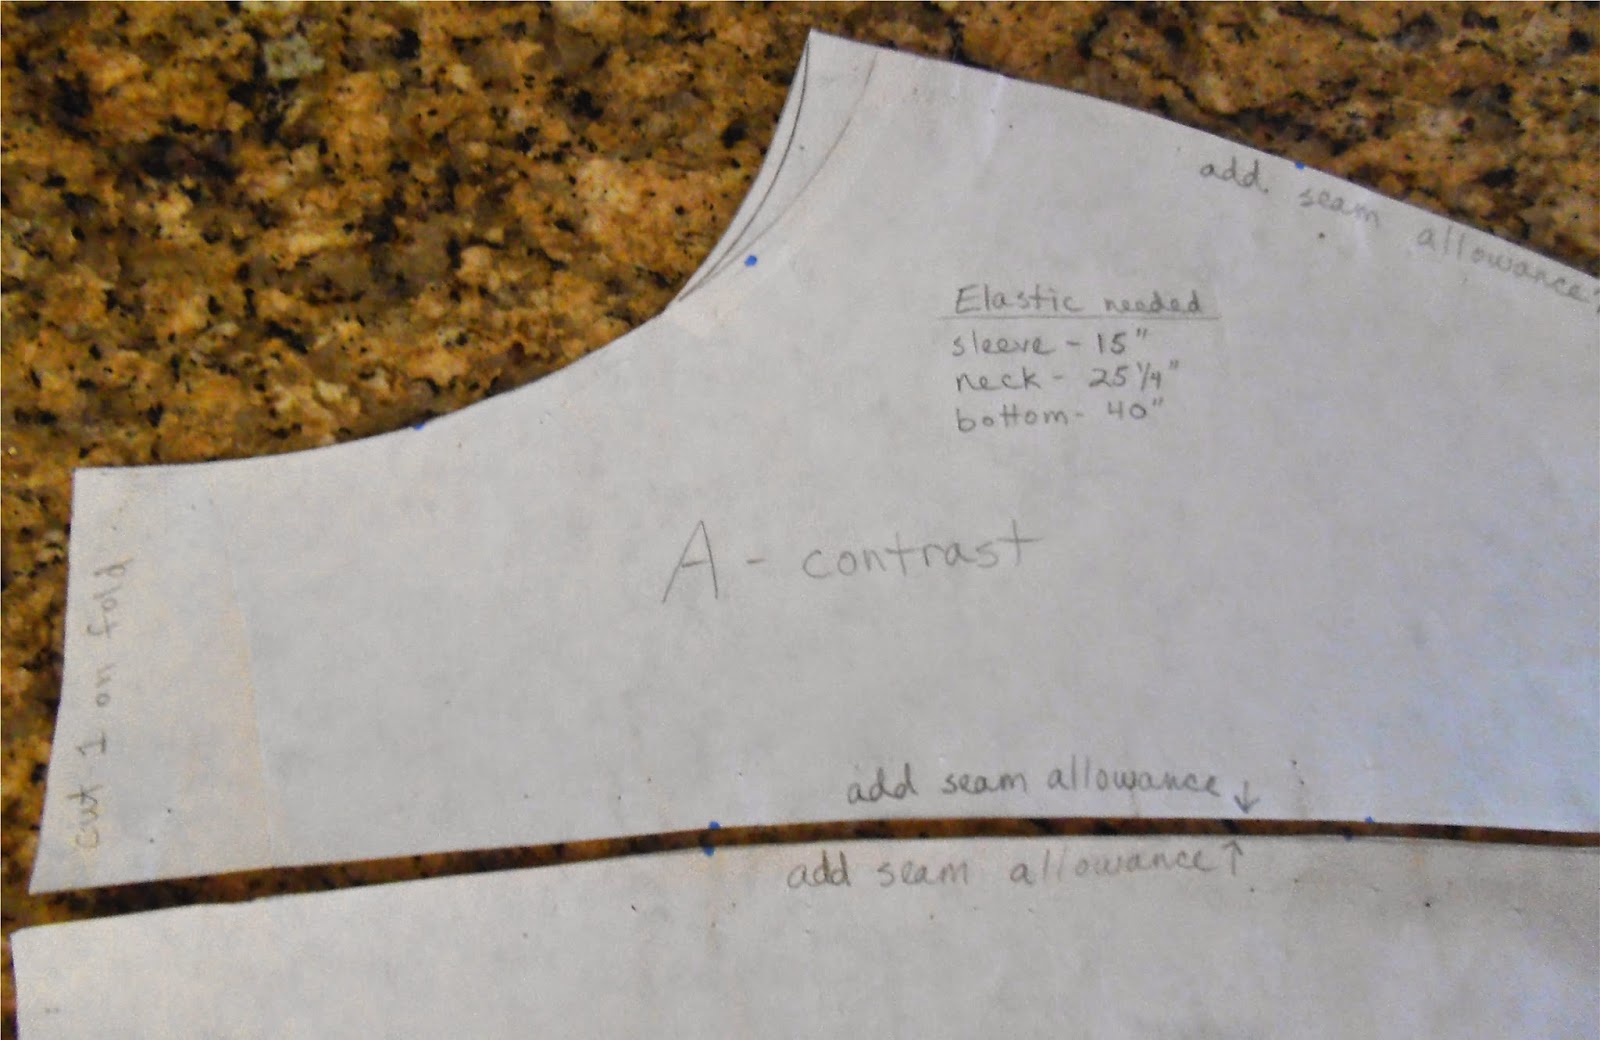
I circled the tiny 90° angle symbol in red to point out what this symbol is telling us. There
is no other number, like 45, to indicate this should be cut on the bias
so we are to assume the symbol indicates a 90° angle. There is no dot drawn here to tell us how far down to start the contrast piece. However, the other dots along the contrast piece are definitely curving downward toward the armpit. The 90° angle symbol is to indicate that the center of the contrast piece should be drawn at a right angle to the center front. For my pattern I drew a gently curving line to connect the dots that are drawn and then connected that line with a straight line drawn at a right angle to the center front. Not at all complicated but worth mentioning so everyone stays on their toes about looking for those tiny symbols.
My first top, on the far left of the photo, was sewn together with the pattern as directed with no alterations except for using both my high and full bust measurements. The result was a loose, comfortable, somewhat boxy shirt. It turned out pretty much how I expected. I was pleasantly surprised to find that the arm hole is not cut too deep so there's no bra showing through there, thankfully.
Fabric Used/Suggested:
All these tops were made with various weights of cotton or rayon knits. The loose shape of this top lends itself to many different fabrics but I would definitely suggest a knit for this one. A woven fabric, even with stretch, would not drape as well and might leave you with an even boxier shape. I finished all of these tops with 5/8" fold over elastic. I have seen 1 inch FOE and might try that next time for a bolder stripe at the edges.
Design Changes:
After the first one I realized I really liked this top and had a bunch more knit prints with which to experiment. My only complaints about the first top were the slightly boxy shape and the width of the neckline, my bra straps are almost showing. Below are photos of my pattern pieces after altering them.


For the tunic on the right, I just added a 6 inch deep rectangle half the width of my fabric to both front and back pieces and attached them with clear elastic in the serged seam. Since the "skirt" panels were just slightly wider than the pattern pieces and the elastic was just slightly smaller than the bodice pieces I stretched them all while I sewed the seam and ended up with a little gathering.
Closing Hints:
Yeah, I know the leggings are a little loud. I was going for clothes that I could wear to and from the gym without actually looking like I just left the gym. A quick change into my tunic and boots and this is what I got. The leggings BTW are Lutterloh pattern #232 from Supplement #287- Nov. 2012. I'll be making more of these too!
What a great way to use up some remnants though, huh? The shorter tops only took about one yard total so if you have one small remnant and a larger one you're in business for this pattern. I'll be tucking this one away for later remnants.
Since we're getting close to the middle of February we can be expecting a new Lutterloh supplement to show up soon. I usually check for it first on the German Lutterloh site here:
https://lutterloh-system.de/produkt-kategorie/archiv/
Please check our side bar or use your favorite search engine to find a Lutterloh dealer closest to you.
Happy Sewing until next time,
Ann in Calif.
*For Ann's patterned fabric the fitted sides are wonderful. If you have a top all made (and the print will not be hurt by it), after the fact you can add some darts. They will be going from the bust circle to the hem. You do not need to change the hem, taper the dart at the bust and hem making it larger at the waist.
It's easy, you have finished your top, it's a bit too loose, put it on wrong side out and pinch in a dart at your waist. If you wish to do the same in the back you'll need a friends help. We dart knit fabric all the time for a better fit. However loose is lovely in hot weather.
Fonnell